Creating Seamless Textures in Photoshop Tutorial
Compatibility:
Photoshop 7 to current version

This tutorial will walk you through how to create seamless textures in Photoshop. I created the tutorial using Photoshop CS2, but it should work very similarly in all versions. This only works on textures, not patterns. Textures are things like granite, dirt, or bark. A pattern is something like lace, or anything with a design on it.
The image that I’m using for this tutorial comes from Angela Sasser at deviantArt (Thank you, Angela!). You can follow along with the tutorial using the same image that I used, if you’d like. You can find the image here, to help you follow along.
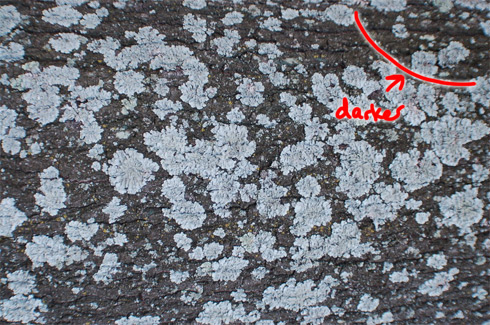
1. First off, take a look at the image. Is one side of it considerably darker than the other? In this one, the top right portion is quite a bit darker than the rest, as you can see. This can make it more difficult to achieve that seamless look, so I’m going to trim the image down.
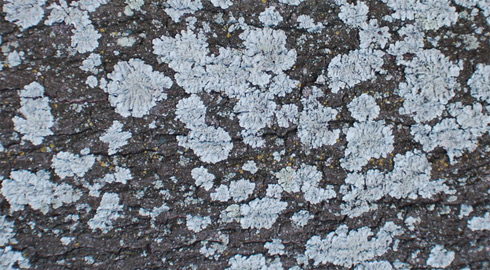
2.I trimmed it down to the lower left portion of the above image, which all looks pretty uniform in color. If you’re not sure how to trim an image, the easiest way is going to be to use the Rectangular Marquee Tool (hit M) to select the part of the image that you want to keep. Then choose Image > Trim.. from the main menu. It should look something like this (but doesn’t need to be exact).
3.The parts of the image that are keeping our sample from being seamless are where the edges meet up, right? So, let’s move those edges so that we can see them better. Yes, we can do that! Photoshop has this wonderful feature for creating seamless textures, called “Offset.”
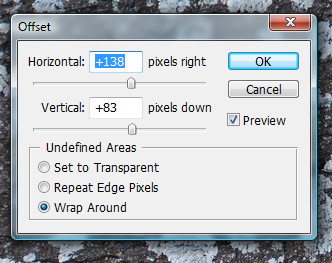
You’ll find it under the main menu: choose Filter > Other > Offset
Use settings similar to those that you see in my image here. What this is doing is taking the edge of the right side of the image and wrapping it around to the left side (and wrapping the bottom around to the top), effectively moving the previous “edges” into the middle of the image!
4.See those lines where things don’t meet up? That’s where our old edges were. The new edges came from the middle of the image somewhere, so they’re now entirely seamless. All we have to do is fix up those visible ones, and we’re good to go!
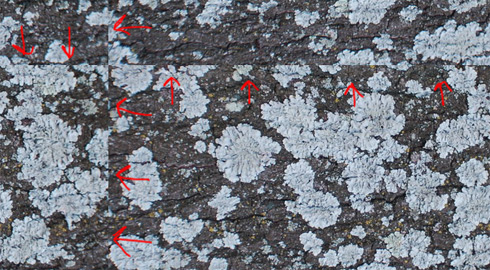

5.Now comes the hardest part. We need to clean up those visible edges somehow, and the Clone Stamp Tool is the way to do it. It’s on your tools window where I highlighted it in red, or you can just hit “S” to make it active.
The brush that you choose to use with it is very important, as well. Do NOT just use a standard round brush, or anything with edges that are too “soft.” Here are a few suggestions. Under “Natural Brushes 2,” any of the 3 chalk brushes work well. Just about any of the brushes in “Natural Brushes” work. I tend toward a few of the brushes in the “Wet Media Brushes” set, as well. Drippy Water, Dry Brush on Towel, Paint on Rough Texture, and Rough Dry Brush are some of my favorites. Especially if you’re working on an earthy texture, like this is. What brush you use will depend upon how rough your texture is. If it’s something fairly soft, then you may be alright with a softer brush. I’d still stay away from the round ones, though. They leave some very definable edges.
6. Make sure that your opacity is set somewhere between 50-85%, as you see here. 50% works good for those softer textures, and up closer to 85% works great for those rough ones, like this one. I’m going to be using the “Rough Dry Brush” from the “Wet Media Brushes” set. As you can see here, I have the size at about 29, and my opacity is set at 82%.

7.If you’ve never used the Clone Stamp Tool before, it can be kind of fun. What it does is takes from one part of the image and paints a replica of it somewhere else on the image. So, what you’re going to want to do is find a nice, clean portion of the image. A portion that does not have that ugly visible line running through it. Somewhere on the lower right, perhaps. Holding ALT, left click on that lower right part of the image.
Now, start painting over that ugly line on the left side. See that small crosshair that shows up over on the lower right? That shows you what the clone stamp tool is using as a reference for what it is currently painting. Make sure that crosshair doesn’t run off the edge of the page, or into the ugly visible line somewhere, or you’re going to get a mess. The easiest way that I’ve found to do this is to hit ALT and get your reference point, then paint a bit over the line. Then hit ALT somewhere else and get another reference point, then paint over the line somewhere else. Always keep your eye on that crosshair to make sure it’s staying where you want it to be!
When you move your brush up, the reference point/crosshair moves up. It will follow your movements exactly.
That may sound complex, but just try it. You’ll see what I mean. It may take a few tries before you really get the hang of the clone stamp tool. It is extremely handy once you do, though!
One thing to keep in mind. Do NOT do too much to those four corners where the lines meet the edges! Use a smaller brush around those areas and make sure that it doesn’t overlap the edge of the image at all. Remember, those edges need to remain seamless, and if you mess with them too much, they won’t be anymore! So, you can paint CLOSE to the edge, but not all the way up to it. (That applies to all of the edges of the painting, not just the four where the lines meet it. But those unsightly lines are the only part of the image that you should be changing, which is why I highlighted just them.)
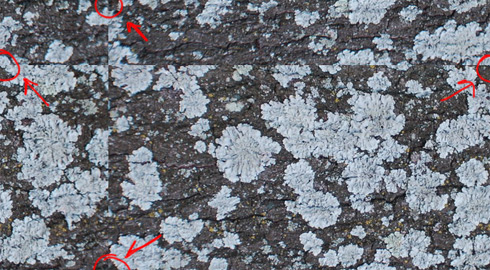
8.This is what my image looks like when I’m done. You can’t see those lines anymore at all!
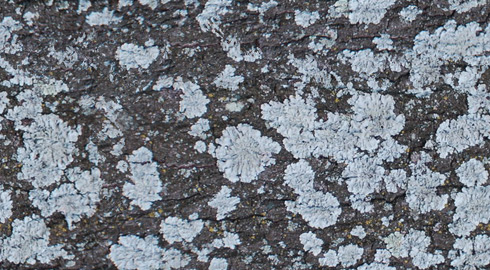

9.Now, to check it. We need to make sure it looks seamless, right?
Choose Edit > Define Pattern.. from the main menu. Then open a new image. I made mine 1000 X 1000 pixels, 72 pixels/inch, RGB color mode, with the Background Contents as White.
Now, create a new layer by clicking on the “Create a New Layer” at the bottom of the layers palette (if your layers palette isn’t visible, choose Window > Layers from the main menu or hit F7).

10.Choose the Paint Bucket Tool from the tools palette, as shown here, and then click anywhere in the canvas. What color you’re using doesn’t matter.

11.At the bottom left of the layers palette, click on the “Add a Layer Style” button, as shown here. Choose “Pattern Overlay” from the menu.
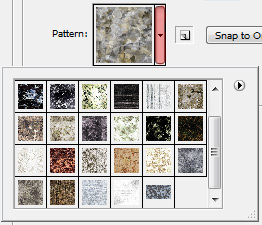
12.On the window that pops up, click on the small arrow just to the right of the thumbnail of your currently selected pattern. Scroll to the bottom (if there’s a scrollbar), and choose the very last pattern. That should be the one we just created.
Once you’ve selected that as your pattern, you should see it over on your canvas. Play around with the Scale slider, so that you’re absolutely sure that you’re seeing more than one instance of your texture. It needs to be small enough to be able to see the edges that are visible, if there are any.
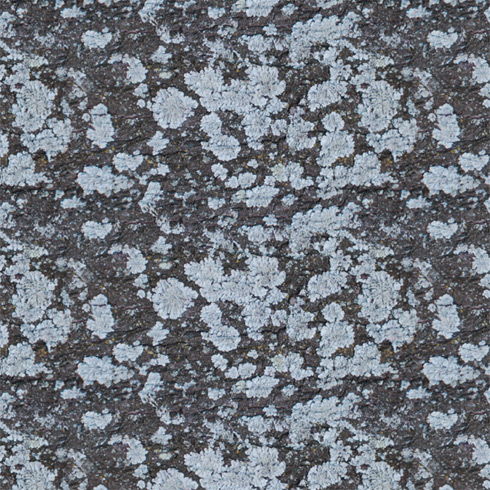
13. You can see how mine looks below. You can see a repeated pattern, and if you zoom in to the image and look around, there are little to no lines visible. If that’s true, then you’re done! If it’s not true, you can always go back to that texture and fix it. If you can’t see the spot that needs to be fixed, chances are that you got too close to an edge with your cloning stamp. So, do another Filter > Other > Offset and you should be able to see it and fix it.
That’s it! You should now have yourself a completely seamless texture!
Some textures will look better than others in this context, of course. If it’s got a big brown spot in the middle of it, your texture may not look all that great repeated… because it will be obvious. Others work very well. This one is somewhere in between, since you can SEE the repeating pattern, but it isn’t too terribly bad.
I hope that you’ve enjoyed this tutorial, and I hope that it answers some of your questions about how to create a seamless texture. If you have any questions, don’t hesitate to ask!